
Bluetape4k Cache Part 3: Near Cache와 Exposed로 캐싱 전략 만들기

Exposed repository 앞에 캐시를 붙이는 일은 처음엔 간단해 보입니다.
- 먼저 캐시를 본다.
- 없으면 DB를 본다.
- 저장할 때 캐시도 갱신한다.
여기까지는 모두가 평화롭습니다. 그런데 “쓰기 실패는?”, “삭제는?”, “다른 인스턴스 local cache는?”, “batch update는?”, “읽기 모델과 쓰기 모델이 다르면?” 같은 질문이 나오면 분위기가 바뀝니다. 평화롭던 회의실에 갑자기 화이트보드가 하나 더 필요해집니다.
bluetape4k-exposed는 이 문제를 repository 계약과 캐시 전략으로 나눠 다룹니다. 캐시를 어디에 둘지, DB 쓰기와 어떤 순서로 묶을지, 실패를 어떻게 볼지 분리해서 선택하게 합니다.
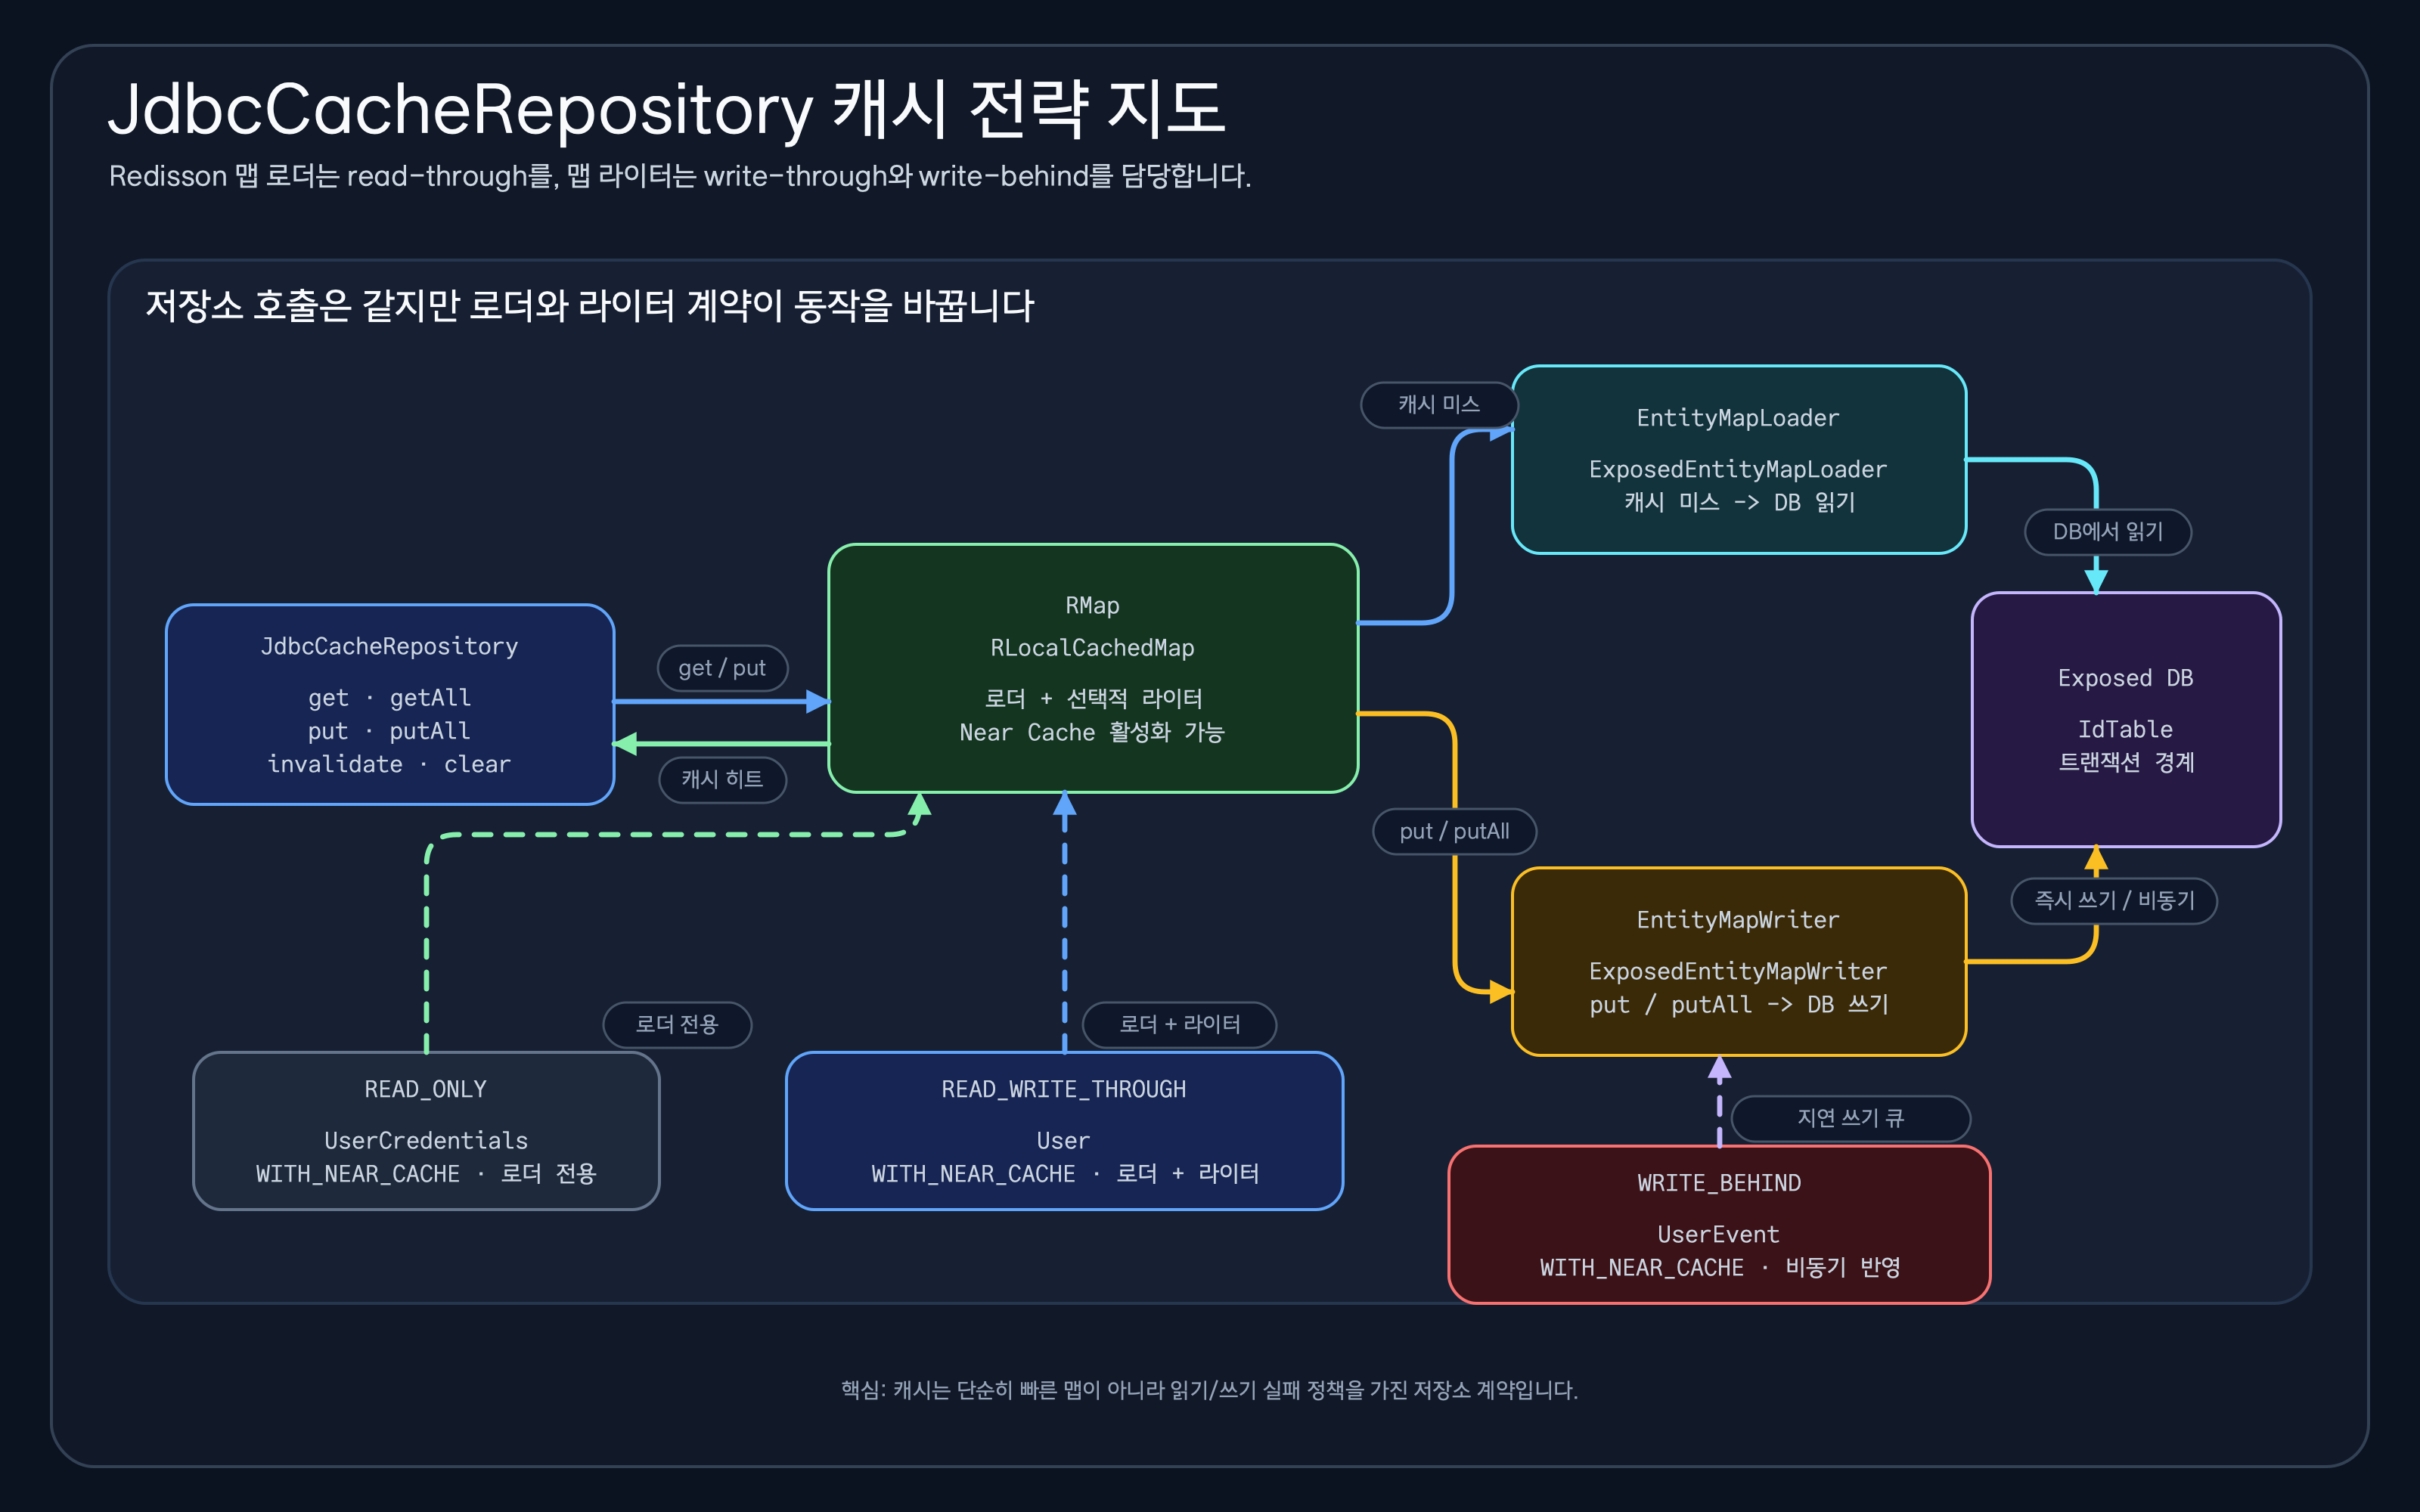
JdbcCacheRepository의 핵심은 Redisson map에 loader와 writer를 붙여 read/write 계약을 바꾸는 것입니다.공통 Repository 계약
섹션 제목: “공통 Repository 계약”기본 계약은 JdbcCacheRepository와 R2dbcCacheRepository에 있습니다. 애플리케이션 입장에서는 get, put, invalidate를 호출하지만, 실제 동작은 선택한 cache mode와 write mode를 따릅니다.
interface JdbcCacheRepository<ID: Any, E: Serializable>: Closeable {    val table: IdTable<ID>    val cacheName: String    val cacheMode: CacheMode    val cacheWriteMode: CacheWriteMode
    fun ResultRow.toEntity(): E    fun extractId(entity: E): ID
    fun findByIdFromDb(id: ID): E?    fun get(id: ID): E?    fun getAll(ids: Collection<ID>): Map<ID, E>
    fun put(id: ID, entity: E)    fun putAll(entities: Map<ID, E>, batchSize: Int = DEFAULT_BATCH_SIZE)
    fun invalidate(id: ID)    fun invalidateAll(ids: Collection<ID>)    fun clear()}
관련 소스: JdbcCacheRepository.kt, R2dbcCacheRepository.kt
여기서 중요한 점은 get과 put이 단순한 map operation이 아니라는 것입니다. 둘 다 repository 정책을 따릅니다. 이 정책을 어떻게 잡느냐에 따라 성능, 일관성, 장애 시 동작이 달라집니다.
구현의 중심: MapLoader와 MapWriter
섹션 제목: “구현의 중심: MapLoader와 MapWriter”AbstractJdbcRedissonRepository는 RMap 또는 RLocalCachedMap을 만들 때 Redisson의 loader/writer를 붙입니다.
protected open val mapLoader: EntityMapLoader<ID, E> by lazy {    ExposedEntityMapLoader(table) { toEntity() }}
protected val mapWriter: EntityMapWriter<ID, E>? by lazy {    when (config.cacheMode) {        RedissonCacheConfig.CacheMode.READ_ONLY -> null        RedissonCacheConfig.CacheMode.READ_WRITE ->            ExposedEntityMapWriter(                entityTable = table,                updateBody = { stmt, entity ->                    with(this@AbstractJdbcRedissonRepository) { stmt.updateEntity(entity) }                },                batchInsertBody = { entity ->                    val stmt = this                    with(this@AbstractJdbcRedissonRepository) { stmt.insertEntity(entity) }                },                writeMode = config.writeMode,            )    }}
전체 소스: JdbcCacheRepository.kt, AbstractJdbcRedissonRepository.kt
그래서 get은 map 조회처럼 보이지만, cache miss에서는 loader가 DB에서 읽어 캐시를 채웁니다. put도 캐시 쓰기처럼 보이지만, write mode가 WRITE_THROUGH이면 writer가 DB에 즉시 반영하고, WRITE_BEHIND이면 writer queue가 비동기로 반영합니다. 이게 cache-aside와 다른 지점입니다. 애플리케이션 코드가 DB 저장 후 cache.put 순서를 직접 조립하지 않습니다.
Read-through
섹션 제목: “Read-through”Read-through는 cache miss에서 EntityMapLoader가 DB를 읽어 cache를 채웁니다. exposed-workshop 11장은 UserCredentialsCacheRepository로 이 경로를 보여줍니다.
@Repositoryclass UserCredentialsCacheRepository( redissonClient: RedissonClient,) : AbstractJdbcRedissonRepository<String, UserCredentialsRecord>( redissonClient = redissonClient, config = RedissonCacheConfig.READ_ONLY_WITH_NEAR_CACHE.copy( name = "exposed:user-credentials", ),) { override val table = UserCredentialsTable override fun ResultRow.toEntity() = toUserCredentialsRecord() override fun extractId(entity: UserCredentialsRecord): String = entity.id}전체 소스: UserCredentialsCacheRepository.kt, UserCredentialsCacheRepositoryTest.kt
읽기가 많은 데이터에 잘 맞습니다. 첫 요청은 DB에서 읽고, 다음 요청은 캐시를 봅니다. 단, write path에서 invalidate를 제대로 해야 합니다. 안 그러면 과거의 캐시와 현재의 DB가 서로 다른 말을 합니다.
Write-through
섹션 제목: “Write-through”Write-through는 put/putAll이 writer-backed Redisson map으로 들어가고, ExposedEntityMapWriter가 DB까지 같은 operation에서 반영합니다. exposed-workshop 11장의 UserCacheRepository는 read-through와 write-through를 함께 사용합니다.
@Repositoryclass UserCacheRepository(    redissonClient: RedissonClient,) : AbstractJdbcRedissonRepository<Long, UserRecord>(    redissonClient = redissonClient,    config = RedissonCacheConfig.READ_WRITE_THROUGH_WITH_NEAR_CACHE.copy(        name = "exposed:users",    ),) {    override val table: UserTable = UserTable    override fun ResultRow.toEntity(): UserRecord = toUserRecord()    override fun extractId(entity: UserRecord): Long = entity.id
    override fun BatchInsertStatement.insertEntity(entity: UserRecord) {        this[UserTable.username] = entity.username        this[UserTable.firstName] = entity.firstName        this[UserTable.lastName] = entity.lastName    }
    override fun UpdateStatement.updateEntity(entity: UserRecord) {        this[UserTable.username] = entity.username        this[UserTable.firstName] = entity.firstName        this[UserTable.lastName] = entity.lastName    }}
관련 예제: UserCacheRepository.kt, UserCacheRepositoryTest.kt
장점은 쓰기 직후 읽기의 최신성이 좋다는 점입니다. 쓰기가 끝나면 캐시도 최신입니다. 단점은 쓰기 latency에 cache write 비용이 들어온다는 점입니다. 성능 그래프에서 putSingle이 read보다 느린 이유가 여기서도 보입니다. 쓰기는 공짜가 아닙니다. 청구서는 latency로 옵니다.
Write-behind
섹션 제목: “Write-behind”Write-behind는 같은 writer를 쓰되 Redisson write mode가 WRITE_BEHIND입니다. put은 cache 쪽에 먼저 반영되고, DB write는 큐에서 비동기로 flush됩니다.
@Repositoryclass UserEventCacheRepository(    redissonClient: RedissonClient,) : AbstractJdbcRedissonRepository<Long, UserEventRecord>(    redissonClient = redissonClient,    config = RedissonCacheConfig.WRITE_BEHIND_WITH_NEAR_CACHE.copy(        name = "exposed:user-events",    ),) {    override val table: UserEventTable = UserEventTable    override fun ResultRow.toEntity(): UserEventRecord = toUserEventRecord()    override fun extractId(entity: UserEventRecord): Long = entity.id
    override fun BatchInsertStatement.insertEntity(entity: UserEventRecord) {        this[UserEventTable.username] = entity.username        this[UserEventTable.eventType] = entity.eventType        this[UserEventTable.eventTime] = entity.eventTime    }}
전체 소스: UserEventCacheRepository.kt, UserEventCacheRepositoryTest.kt
Write-behind는 쓰기 latency를 낮출 수 있습니다. 대신 설계해야 할 것이 늘어납니다.
- queue overflow 시 어떻게 할지
- close 시 pending write를 flush할지
- 같은 key의 연속 update를 어떻게 병합할지
- remove 후 stale read를 어떻게 막을지
- retry 중복이 DB upsert와 충돌하지 않는지
여기서부터 캐시는 “빠른 Map”이 아니라 작은 분산 시스템입니다. 작은 분산 시스템은 작게 실패해야 합니다. 크게 실패하면 이름만 작습니다.
CacheMode와 CacheWriteMode
섹션 제목: “CacheMode와 CacheWriteMode”bluetape4k-exposed는 local/remote/near cache와 write strategy를 분리해서 표현합니다.
관련 소스: CacheMode.kt, CacheWriteMode.kt, LocalCacheConfig.kt
이 분리는 꼭 필요합니다. “어디에 캐시할 것인가”와 “언제 쓸 것인가”는 다른 질문입니다. 같은 Redis를 쓰더라도 read-through, write-through, write-behind는 운영 의미가 다릅니다.
| 질문 | 예 |
|---|---|
| 캐시 위치 | local Caffeine, remote Redis, Near Cache |
| 캐시 읽기 경로 | read-through loader |
| write mode | READ_ONLY, WRITE_THROUGH, WRITE_BEHIND |
| API shape | JDBC, suspended JDBC, R2DBC |
| 일관성 목표 | 상대적으로 강한 일관성, eventual consistency, best effort 대체 경로 |
벤치마크 결과
섹션 제목: “벤치마크 결과”exposed-workshop 11장의 04-benchmark는 캐시 전략을 실제 수치로 비교합니다. AverageTime 기준이라 낮을수록 좋습니다.
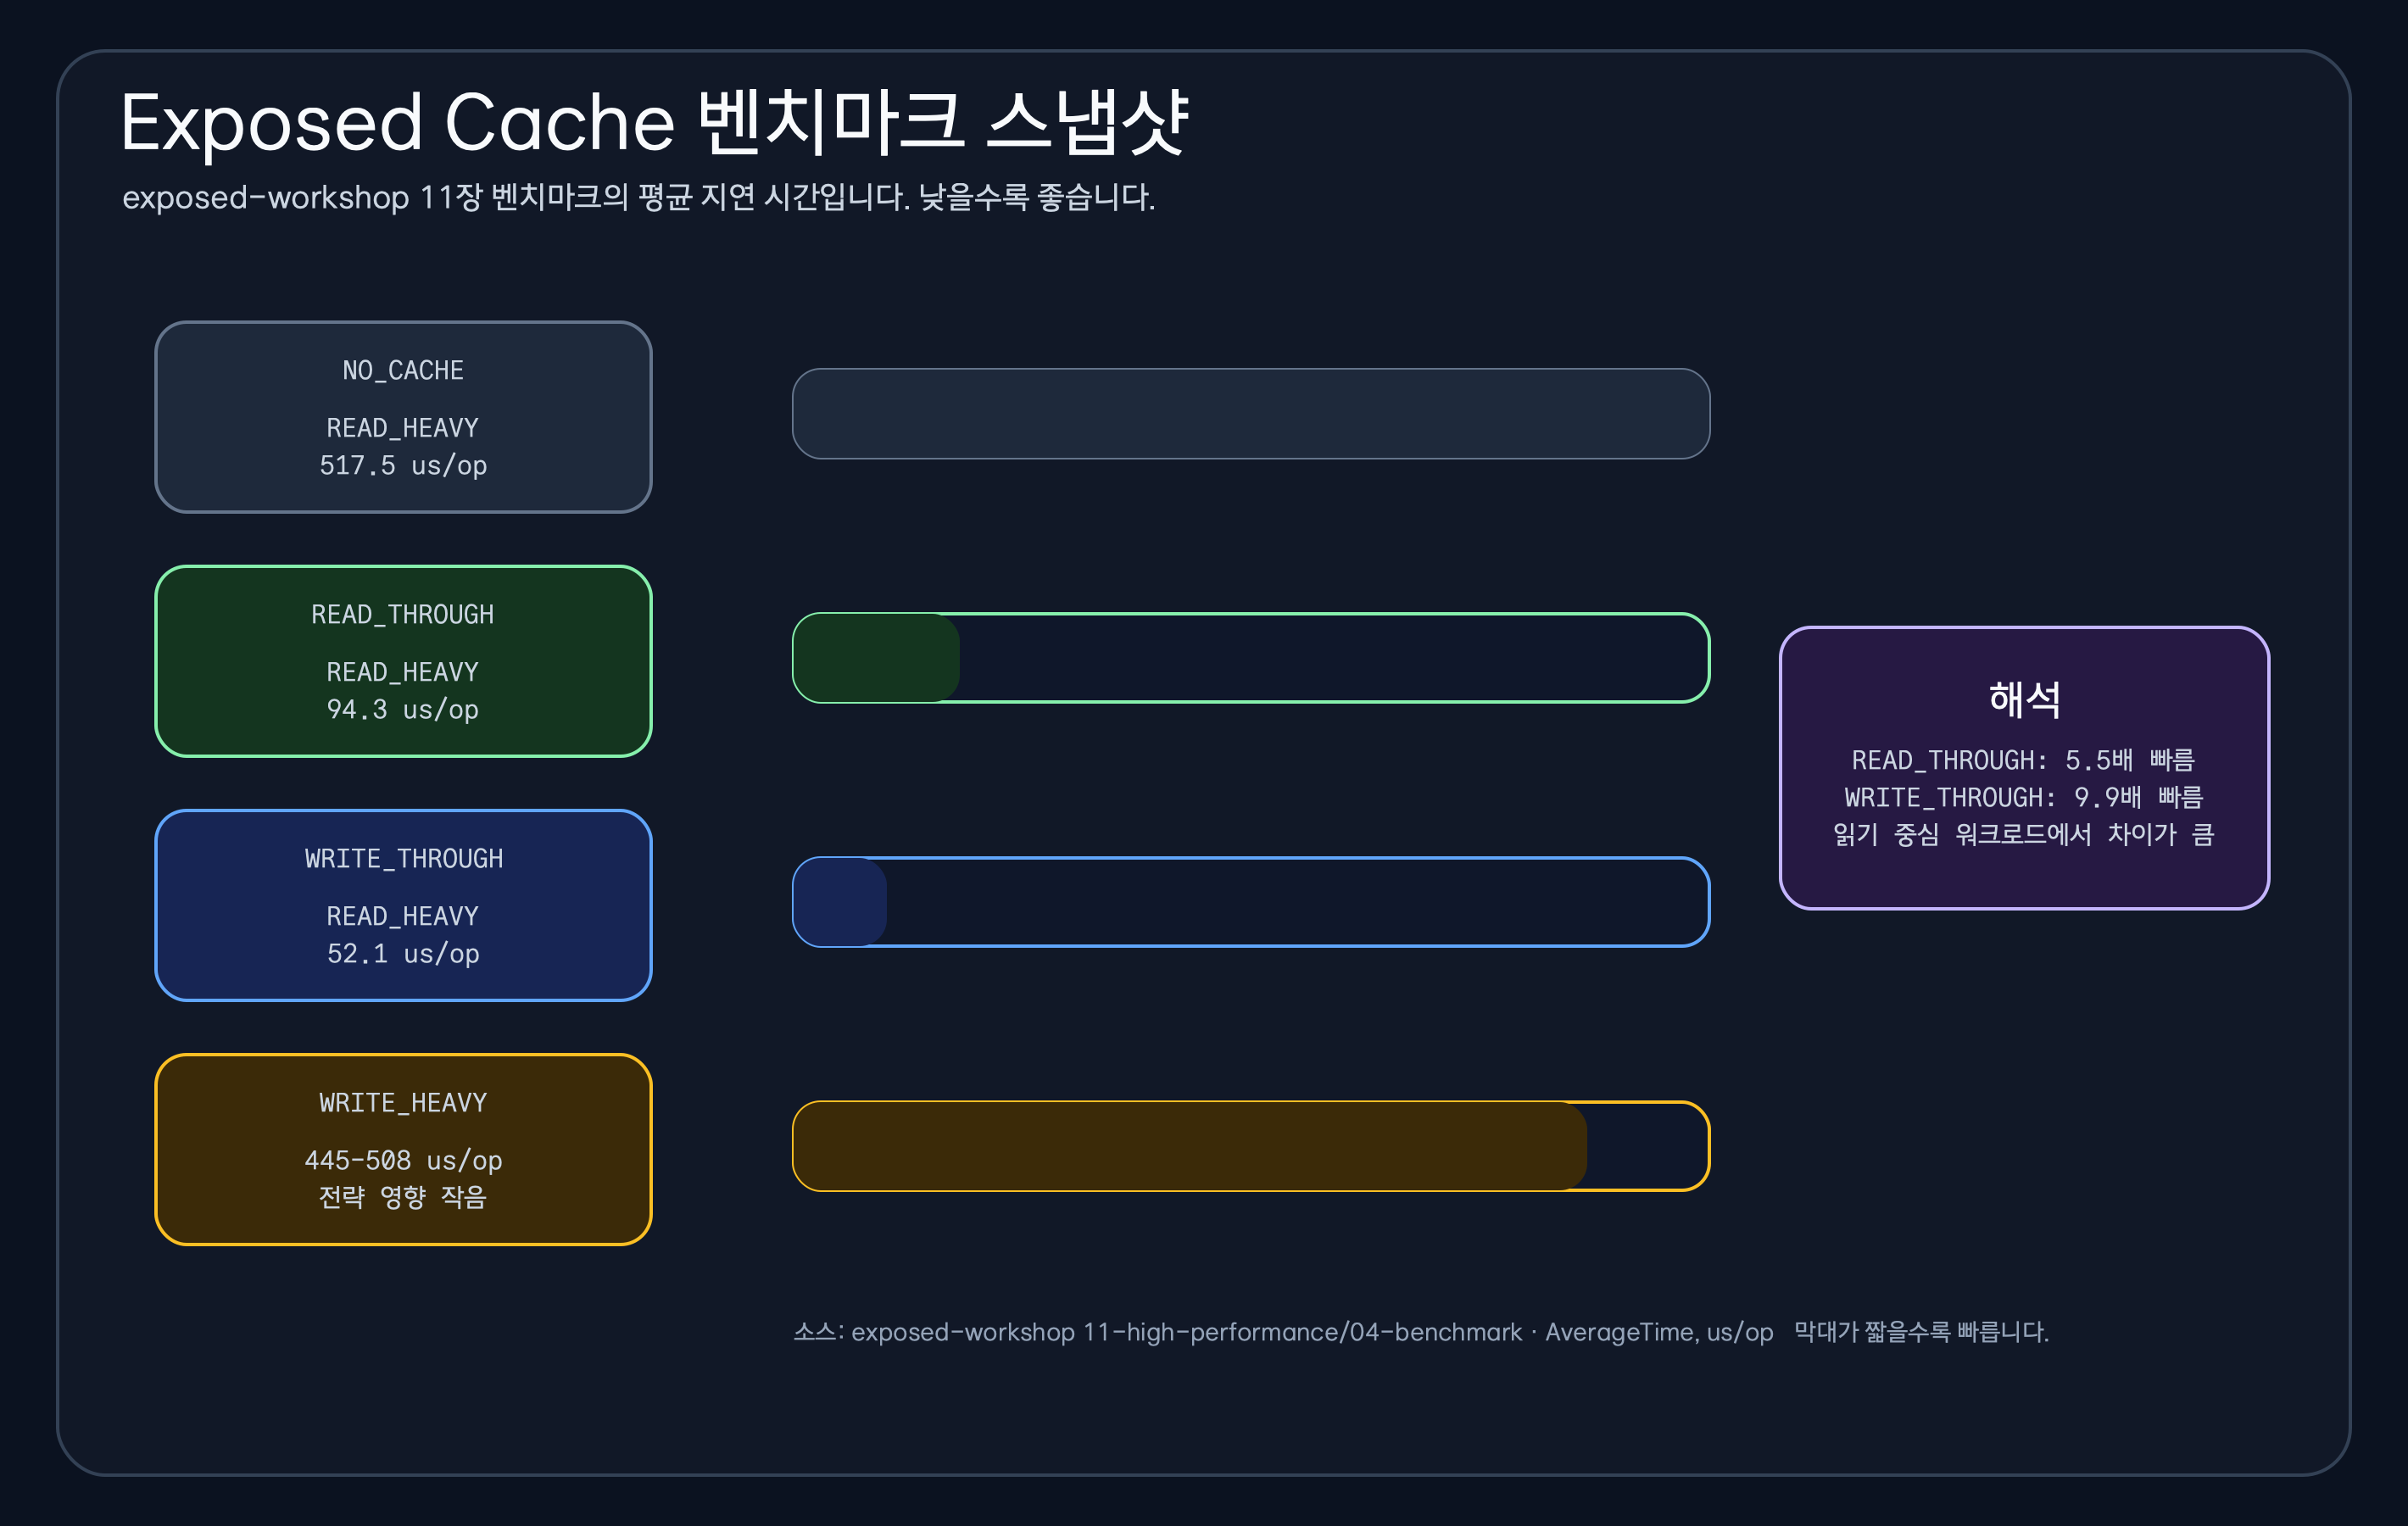
관련 소스: CacheStrategyComparisonBenchmark.kt, ReadThroughCacheBenchmark.kt, BENCHMARK-REPORT.md
| 전략 | 워크로드 | payload | 평균 |
|---|---|---|---|
NO_CACHE | READ_HEAVY | 256B | 517.520 us/op |
READ_THROUGH | READ_HEAVY | 256B | 94.320 us/op |
WRITE_THROUGH | READ_HEAVY | 256B | 52.103 us/op |
NO_CACHE | WRITE_HEAVY | 256B | 507.766 us/op |
READ_THROUGH | WRITE_HEAVY | 256B | 468.735 us/op |
WRITE_THROUGH | WRITE_HEAVY | 256B | 445.363 us/op |
Read-heavy에서는 READ_THROUGH가 기준선보다 약 5.5배, WRITE_THROUGH가 약 9.9배 빠릅니다. 반대로 write-heavy에서는 차이가 1.1배 수준으로 줄어듭니다. 캐시는 읽기 경로에서 돈을 벌고, 쓰기 경로에서 영수증을 받습니다.
Read-through 단건 benchmark도 같이 봐야 합니다.
| 벤치마크 | payload | 평균 |
|---|---|---|
dbOnlyRead | 256B | 0.001 us/op |
readThroughCacheHit | 256B | 0.003 us/op |
readThroughCacheMiss | 256B | 0.119 us/op |
hit은 싸고, miss는 invalidate와 reload 때문에 훨씬 비쌉니다. 그래서 Near Cache의 핵심 지표는 여전히 hit ratio입니다. 캐시가 맞히면 영웅이고, 자주 틀리면 아주 부지런한 장식품입니다.
전략 선택표
섹션 제목: “전략 선택표”| 전략 | 잘 맞는 경우 | 조심할 점 |
|---|---|---|
| Read-through | 읽기가 많고 write가 적음 | write 후 invalidate 누락 |
| Write-through | 쓰기 직후 읽기 최신성이 중요 | 쓰기 지연 시간 증가 |
| Write-behind | write burst를 흡수해야 함 | queue, retry, flush, stale read |
| NearCache + read-through | hot read가 명확함 | L1 hit ratio와 invalidation |
| NearCache + write-behind | local 반응성을 크게 원함 | 장애 시 의미론을 문서화해야 함 |
다음 글에서는 이론을 잠깐 내려놓고 bluetape4k-workshop의 실전 예제로 갑니다. 코드는 늘 친절합니다. 단지 우리가 급하게 읽을 뿐입니다.
댓글
GitHub 계정으로 의견을 남기거나 reaction을 남길 수 있습니다.