
Bluetape4k AWS Part 5: 실전 예제로 적용하기
이 글은 bluetape4k-aws 시리즈의 5편입니다. Part 1에서는
프로젝트 개요와 개념 모델을 살펴봤고, Part 2에서는
핵심 모듈과 AWS 서비스 지원 현황을
정리했습니다. Part 3에서는 Spring Boot와 Ktor 통합을,
Part 4에서는 Spring Cloud AWS와의 비교를 살펴봤습니다.
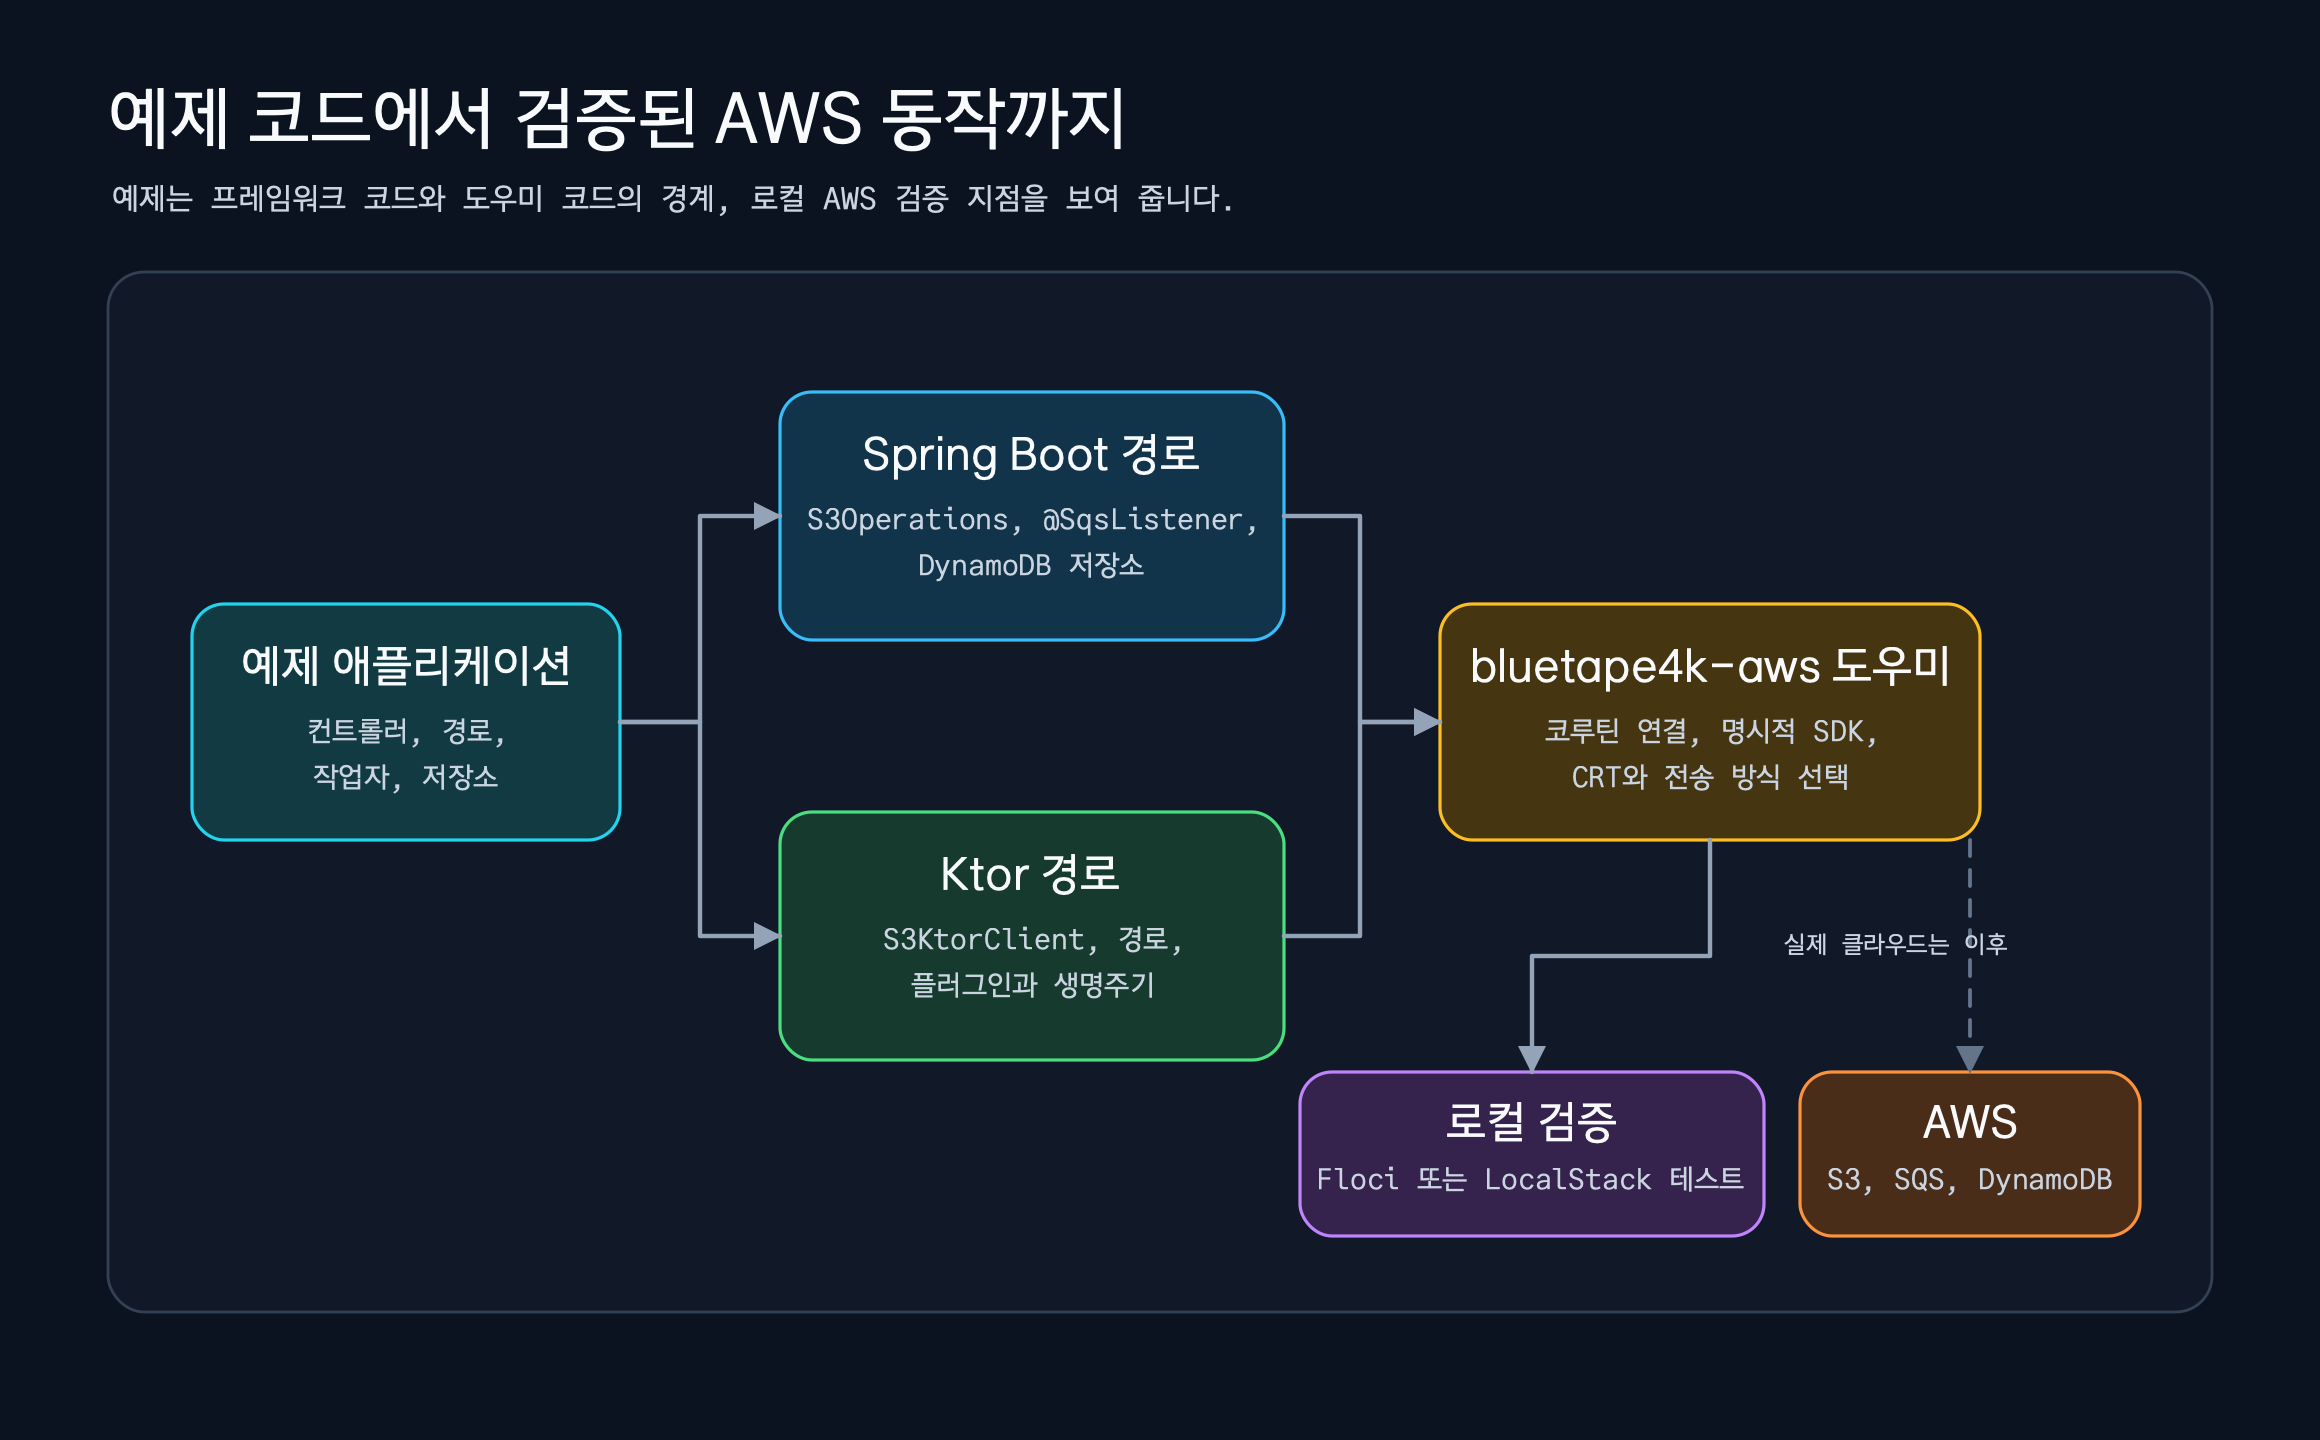
이번 글에서는 실제 예제를 살펴봅니다. bluetape4k-aws/examples/에는 Spring Boot 4와 Ktor 3로 작성한
S3, SQS, DynamoDB, Exposed 예제가 있고, bluetape4k-workshop/aws에는 애플리케이션 코드에서 스토리지 백엔드를
어떻게 감출 수 있는지 보여 주는 워크숍 예제가 있습니다.
여기서는 예제를 README 목록처럼 훑지 않습니다. 서비스 팀이 bluetape4k-aws를 도입할 때 어떤 순서로 보면 좋은지,
어디까지 라이브러리에 맡기고 어디부터 애플리케이션이 결정해야 하는지를 살펴봅니다.
먼저 S3부터 보는 이유
섹션 제목: “먼저 S3부터 보는 이유”AWS 예제를 처음 볼 때는 S3부터 보는 편이 좋습니다. 업로드, 다운로드, 목록 조회, 삭제, 사전 서명 URL이 모두 있고 로컬 에뮬레이터 설정도 바로 드러납니다. 작은 객체 API에서 시작해 클라이언트 측 암호화, 콘텐츠 유형 감지, 스트리밍 다운로드, 사전 서명 URL까지 확장되므로 라이브러리가 줄여 주는 반복 작업을 파악하기 쉽습니다.
Spring Boot 예제는 S3Operations를 주입받는 WebFlux 컨트롤러로 시작합니다. 컨트롤러는 S3Client 빌더,
엔드포인트 재정의, 경로 방식 접근, 서명기 설정을 직접 알 필요가 없습니다.
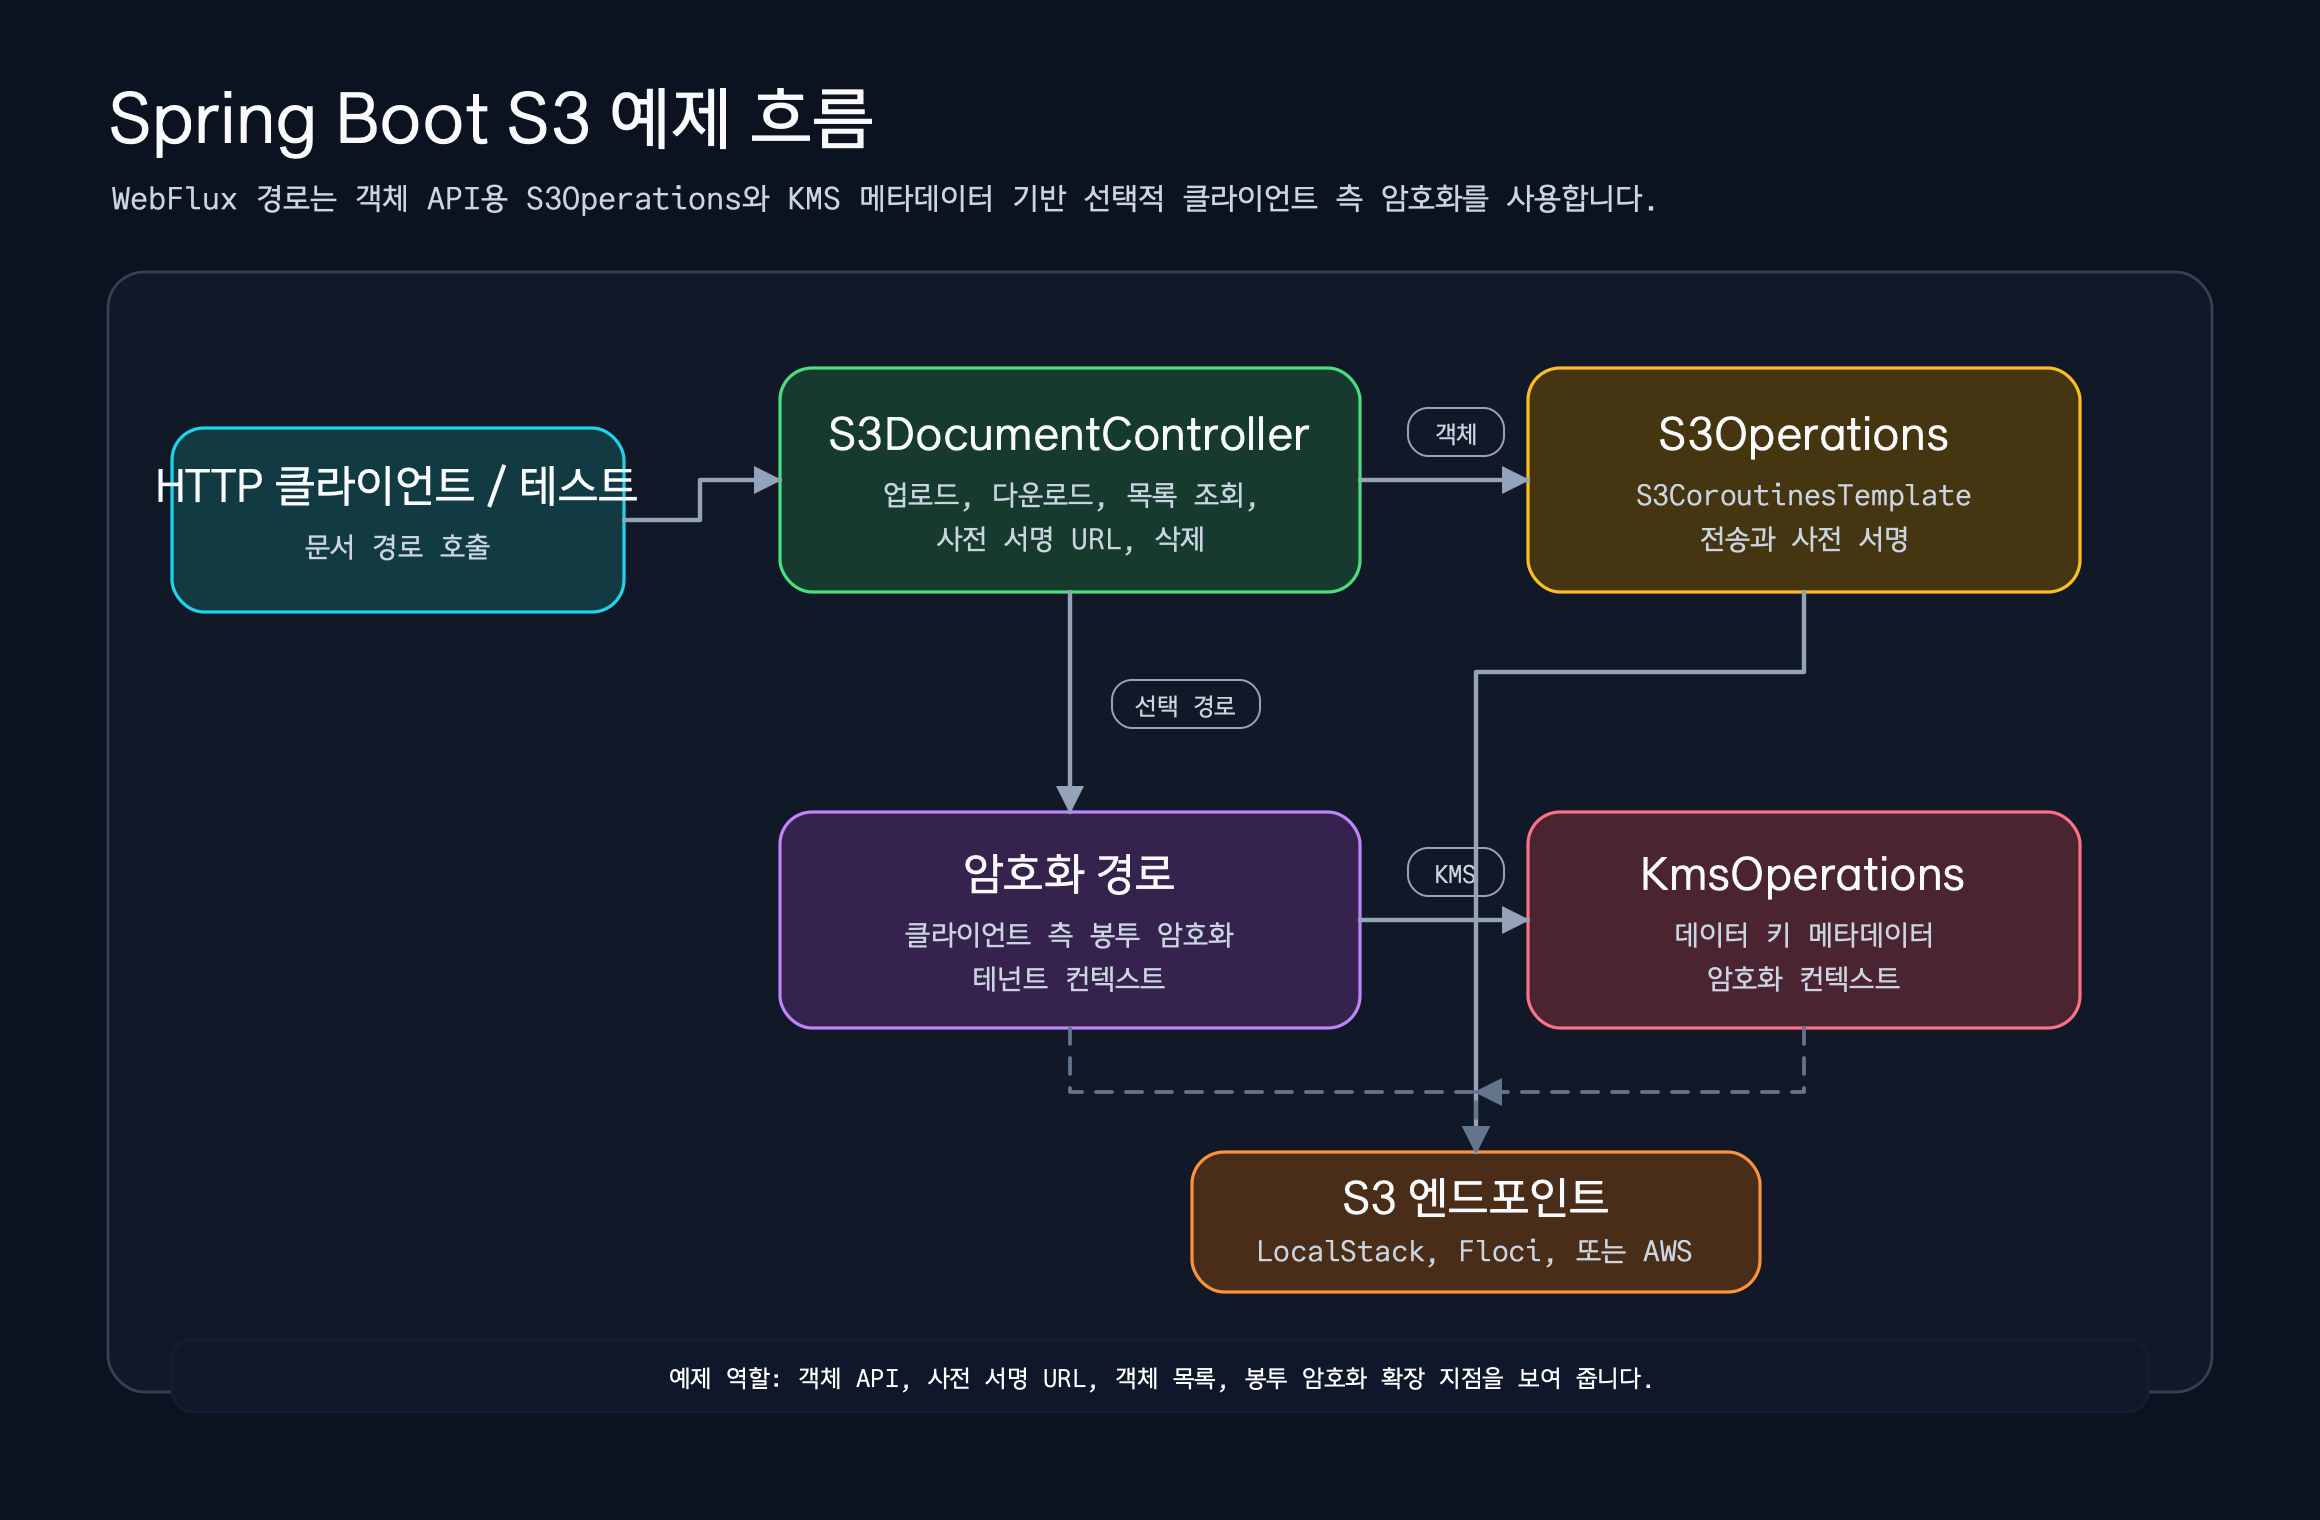
@RestController@RequestMapping("/s3/documents")class S3DocumentController( private val s3: S3Operations, private val encryptedS3Provider: ObjectProvider<S3ClientSideEncryptionOperations>,) { @PutMapping(consumes = [MediaType.APPLICATION_OCTET_STREAM_VALUE]) suspend fun upload( @RequestParam bucket: String, @RequestParam key: String, @RequestBody bytes: ByteArray, @RequestHeader(HttpHeaders.CONTENT_TYPE, required = false) contentType: String?, ): S3DocumentUploadResponse { val response = s3.upload(bucket = bucket, key = key, bytes = bytes, contentType = contentType) return S3DocumentUploadResponse(bucket = bucket, key = key, eTag = response.eTag()) }}이 코드에서 애플리케이션이 직접 사용하는 것은 S3Operations입니다. 업로드 결과를 응답 DTO로 변환하고 도메인 API를
노출하는 일만 컨트롤러에 남습니다. 같은 컨트롤러에는 암호화 경로도 있습니다. tenant 값을 메타데이터와
암호화 컨텍스트로 넘기면 실제 봉투 암호화는 S3ClientSideEncryptionOperations가 처리합니다.
설정에서는 LocalStack이나 Floci 같은 에뮬레이터를 사용할 때 필요한 차이가 바로 드러납니다.
bluetape4k: aws: s3: region: ap-northeast-2 endpoint-override: http://localhost:4566 path-style-access-enabled: true presign: duration: PT15M client-side-encryption: enabled: true key-id: alias/example-s3실제 AWS에 연결할 때는 endpoint-override를 제거하고 AWS SDK 자격 증명 공급자 체인을 사용합니다. 예제 테스트는 버킷을
만든 뒤 업로드, 다운로드, 목록 조회, 사전 서명 GET/PUT, 삭제, 결정적 테스트 KMS 기반 클라이언트 측 암호화
도우미를 검증합니다. 단순한 문서 예제가 아니라 이 설정으로 실제 호출이 동작하는지 확인할 수 있습니다.
실제 흐름으로 보면 이 예제는 네 단계로 읽으면 됩니다.
- 먼저
PUT /s3/documents로 객체를 올립니다. 컨트롤러는 요청 본문을ByteArray로 받고,Content-Type헤더를 그대로S3Operations.upload()에 넘깁니다. - 이어서
GET /s3/documents로 같은 키를 읽습니다. 이때 컨트롤러는 S3 응답 스트림을 직접 다루지 않고,downloadBytes()결과를ResponseEntity<ByteArray>로 반환합니다. GET /s3/documents/objects로 접두사 목록을 확인합니다. 운영 코드에서는 이 지점이 파일 목록 API나 일괄 처리 대상 조회로 이어집니다.- 마지막으로
presigned-get,presigned-put경로를 봅니다. 파일 자체는 S3에 두고, 애플리케이션은 유효 기간이 제한된 URL만 발급하는 구조를 만들 때 필요한 흐름입니다.
curl -X PUT \  "http://localhost:8080/s3/documents?bucket=demo-bucket&key=docs/hello.txt" \  -H "Content-Type: text/plain" \  --data-binary "hello bluetape4k-aws"
curl \  "http://localhost:8080/s3/documents?bucket=demo-bucket&key=docs/hello.txt"
curl \  "http://localhost:8080/s3/documents/presigned-get?bucket=demo-bucket&key=docs/hello.txt"
여기서 핵심은 curl 명령 자체가 아닙니다. 컨트롤러에 남은 코드를 보면 S3 SDK의 세부 설정이 업무 API로
노출되지 않습니다. 버킷과 키는 여전히 애플리케이션이 결정하지만 서명기 생성, 요청 빌더 조립,
LocalStack 엔드포인트 설정, 경로 방식 접근 같은 반복 작업은 도우미와 자동 설정이 담당합니다.
암호화 경로도 같은 관점으로 읽으면 됩니다. PUT /s3/documents/encrypted는 tenant 값을 메타데이터와 암호화
컨텍스트에 함께 넣습니다. 운영 서비스에서는 테넌트, 문서 유형, 보존 정책처럼 이후 감사나 접근
제어에서 다시 확인해야 하는 값을 여기에 담을 수 있습니다.
val response = encryptedS3().uploadEncrypted( bucket = bucket, key = key, bytes = bytes, metadata = mapOf("tenant" to tenant), encryptionContext = mapOf("tenant" to tenant), contentType = contentType,)물론 모든 서비스가 클라이언트 측 암호화를 즉시 활성화해야 한다는 뜻은 아닙니다. 이 예제가 보여 주는 것은 선택지를
어디에 둘 것인가입니다. 일반 업로드·다운로드 API는 그대로 두고, 암호화가 필요한 경로에서는
S3ClientSideEncryptionOperations를 명시적으로 사용합니다. 이렇게 하면 기본 S3 저장과 테넌트 컨텍스트를 가진
암호화 저장이 컨트롤러 수준에서 분리되고, 실제 봉투 암호화 구현은 라이브러리에 맡길 수 있습니다.
Ktor에서는 같은 S3를 다르게 연결한다
섹션 제목: “Ktor에서는 같은 S3를 다르게 연결한다”Ktor 예제는 Spring Boot 예제의 구조를 그대로 모방하지 않습니다. Ktor에서는 S3KtorClient를 라우팅에 연결하고,
라우팅 코드가 suspend 흐름으로 S3 REST 클라이언트를 호출합니다.
fun Route.s3DocumentRoutes( s3: S3KtorClient, bucket: String,) { put("/s3/objects/{key...}") { val key = call.s3KeyParameter() val bytes = call.receive<ByteArray>() val response = s3.putObject( bucket = bucket, key = key, bytes = bytes, contentType = call.request.headers["Content-Type"], ) call.respondText("""{"key":"$key","eTag":"${response.eTag}"}""") }}Ktor 예제에서 눈여겨볼 부분은 꼬리 경로 매개변수로 슬래시가 포함된 객체 키를 보존한다는 점입니다.
/s3/objects/{key...} 경로는 docs/hello.txt 같은 키를 분리하지 않습니다. 또한 getObjectStream,
putConfigObject, getConfigObject, presignGetObject, presignPutObject 같은 경로를 통해 Ktor 서비스가
Spring 빈 없이도 같은 S3 작업을 코루틴 중심 코드로 유지하는 방식을 확인할 수 있습니다.
LocalStack 형태의 엔드포인트를 사용할 때는 경로 방식 주소를 명시합니다.
val s3 = s3KtorClientOf( region = "ap-northeast-2", endpointOverride = Url("http://localhost:4566"), addressingStyle = S3KtorAddressingStyle.Path,)Part 3에서 정리했듯이 어댑터의 형태가 같을 필요는 없습니다. Spring Boot에는 자동 설정과 빈 주입이 자연스럽고, Ktor에는 라우팅과 플러그인 생명주기가 자연스럽습니다. 같은 AWS 문제라도 각 프레임워크에 맞는 방식으로 풀어야 합니다.
SQS, DynamoDB, Exposed는 어떤 순서로 보면 좋은가
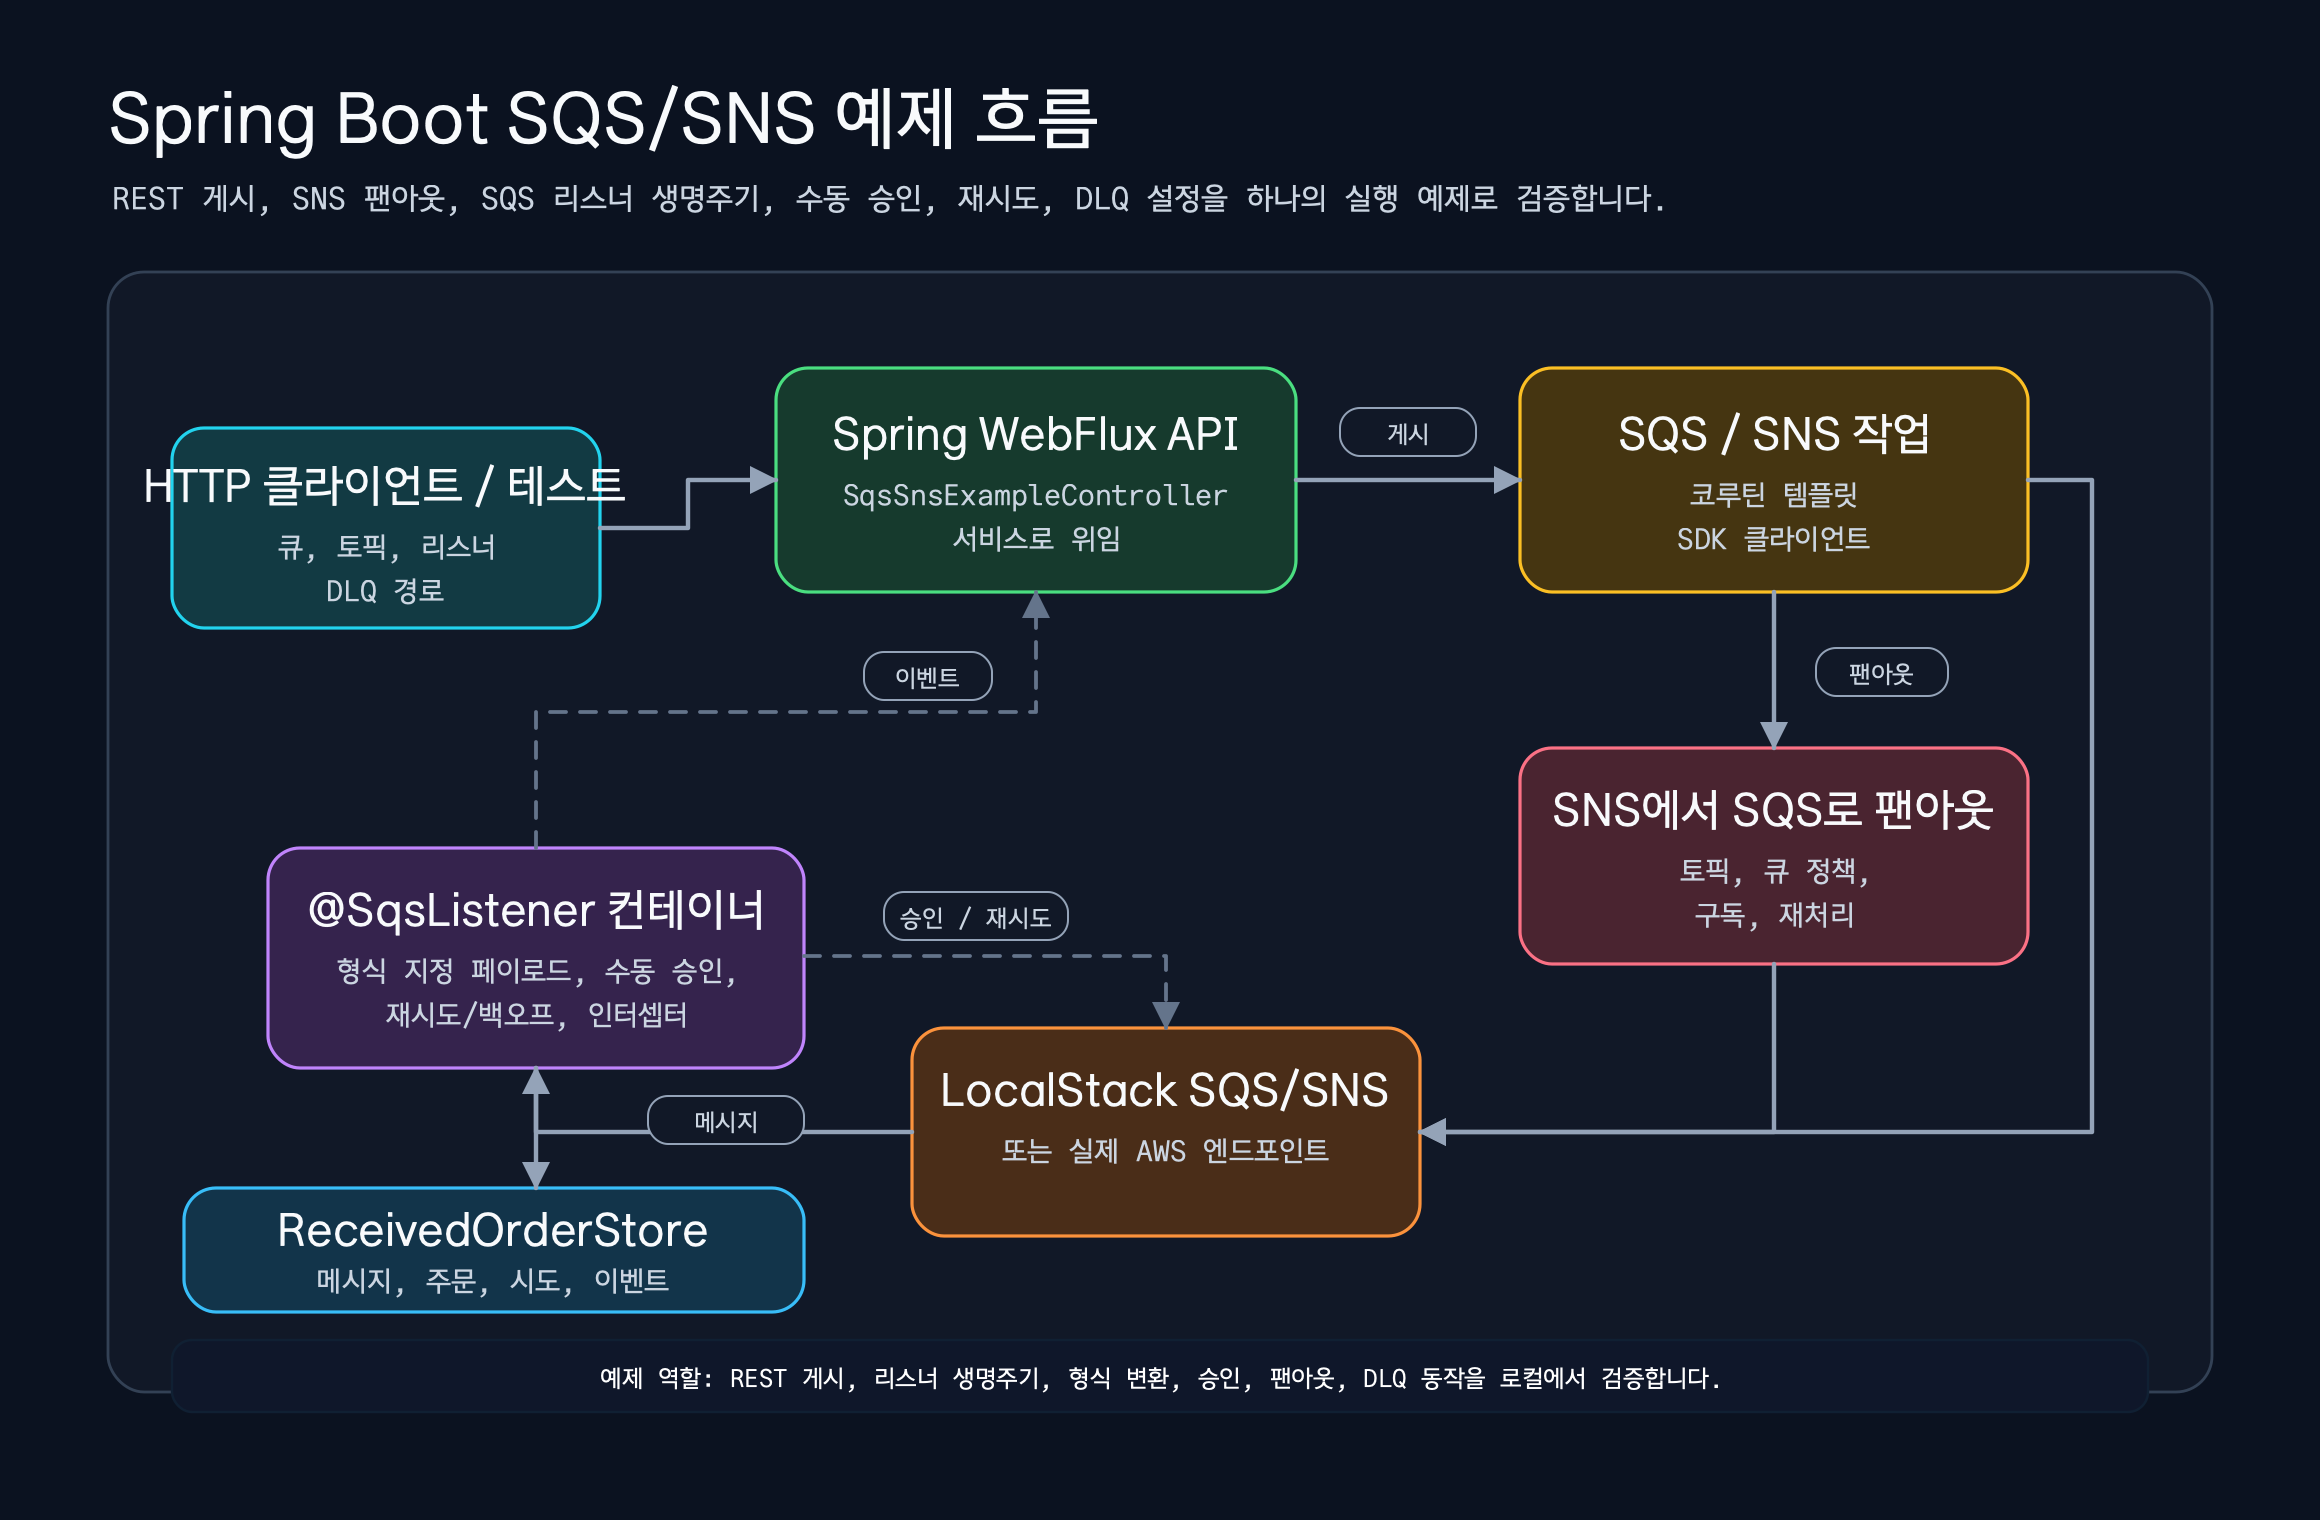
섹션 제목: “SQS, DynamoDB, Exposed는 어떤 순서로 보면 좋은가”S3 다음에는 SQS를 보는 편이 좋습니다. SQS는 단순히 sendMessage를 감싸는 문제에서 끝나지 않습니다. 수신
루프, 가시성 타임아웃, 삭제 시점, 재시도, 타입이 지정된 페이로드 변환, 수동 승인을 함께 다뤄야 합니다.
Spring Boot SQS 예제에서는 이 경계가 @SqsListener로 드러납니다.
@Componentclass OrderMessageListener(    private val store: ReceivedOrderStore,) {    @SqsListener(queue = "\${example.aws.sqs.listener-queue:orders}", maxMessages = 1, waitTimeSeconds = 1)    fun handle(message: String) {        store.record(message)    }
    @SqsListener(id = "typed-order-listener", queue = "\${example.aws.sqs.typed-listener-queue:typed-orders}")    suspend fun handleTyped(order: OrderPayload, acknowledgement: SqsAcknowledgement) {        store.record(order)        acknowledgement.acknowledge()    }}
여기서 애플리케이션 코드는 무엇을 처리할지에 집중합니다. 리스너 컨테이너는 메시지 폴링, 처리기 호출, 승인 처리, 실패한 메시지를 삭제하지 않는 동작, 재시도·백오프 설정을 맡습니다. 예제에는 SNS → SQS 팬아웃, DLQ 재처리 정책, 인터셉터 이벤트 기록도 포함되어 있어 운영에 필요한 확장 지점을 확인할 수 있습니다.
DynamoDB 예제는 저장소 추상화의 출발점으로 보면 됩니다.
@Repositoryclass OrderRepository( enhancedClient: DynamoDbEnhancedAsyncClient, tableNameResolver: DynamoDbTableNameResolver,) : AbstractCoroutinesDynamoDbRepository<Order, String>( enhancedClient = enhancedClient, tableNameResolver = tableNameResolver, entityClass = Order::class.java,) { override val tableName: String = "orders" override fun keyFromId(id: String): Key = Key.builder().partitionValue(id).build() override fun keyFromItem(item: Order): Key = Key.builder().partitionValue(item.id).build()}이 예제는 DynamoDB를 ORM처럼 숨기자는 뜻이 아닙니다. 테이블 이름, 파티션 키, 향상된 클라이언트 매핑은
명시적으로 둡니다. 대신 save, findById, delete, scan, query처럼 반복되는 코루틴 저장소 흐름을
공통 기반 클래스에 맡깁니다.
Exposed 예제는 AWS와 데이터베이스 레지스트리가 만나는 지점입니다. AWS 설정이나 보안 정보를 읽어 데이터베이스 연결을
구성하는 서비스에는 aws-exposed와 프레임워크 어댑터가 함께 필요합니다. Part 5에서는 깊게 파고들기보다,
S3·SQS·DynamoDB 예제와 같은 구조로 설정 → 도우미 → 프레임워크 연결 → 테스트를 확인하는 용도로 보면 됩니다.
StorageService 워크숍: 서비스 코드가 안정되는 지점
섹션 제목: “StorageService 워크숍: 서비스 코드가 안정되는 지점”bluetape4k-workshop/aws/storage-abstraction은 실제 서비스 팀이 따라 하기 좋은 예제입니다. 여기서는
애플리케이션은 S3를 직접 알지 않습니다. StorageService에만 의존하며 Spring 프로필로 백엔드를 바꿉니다.
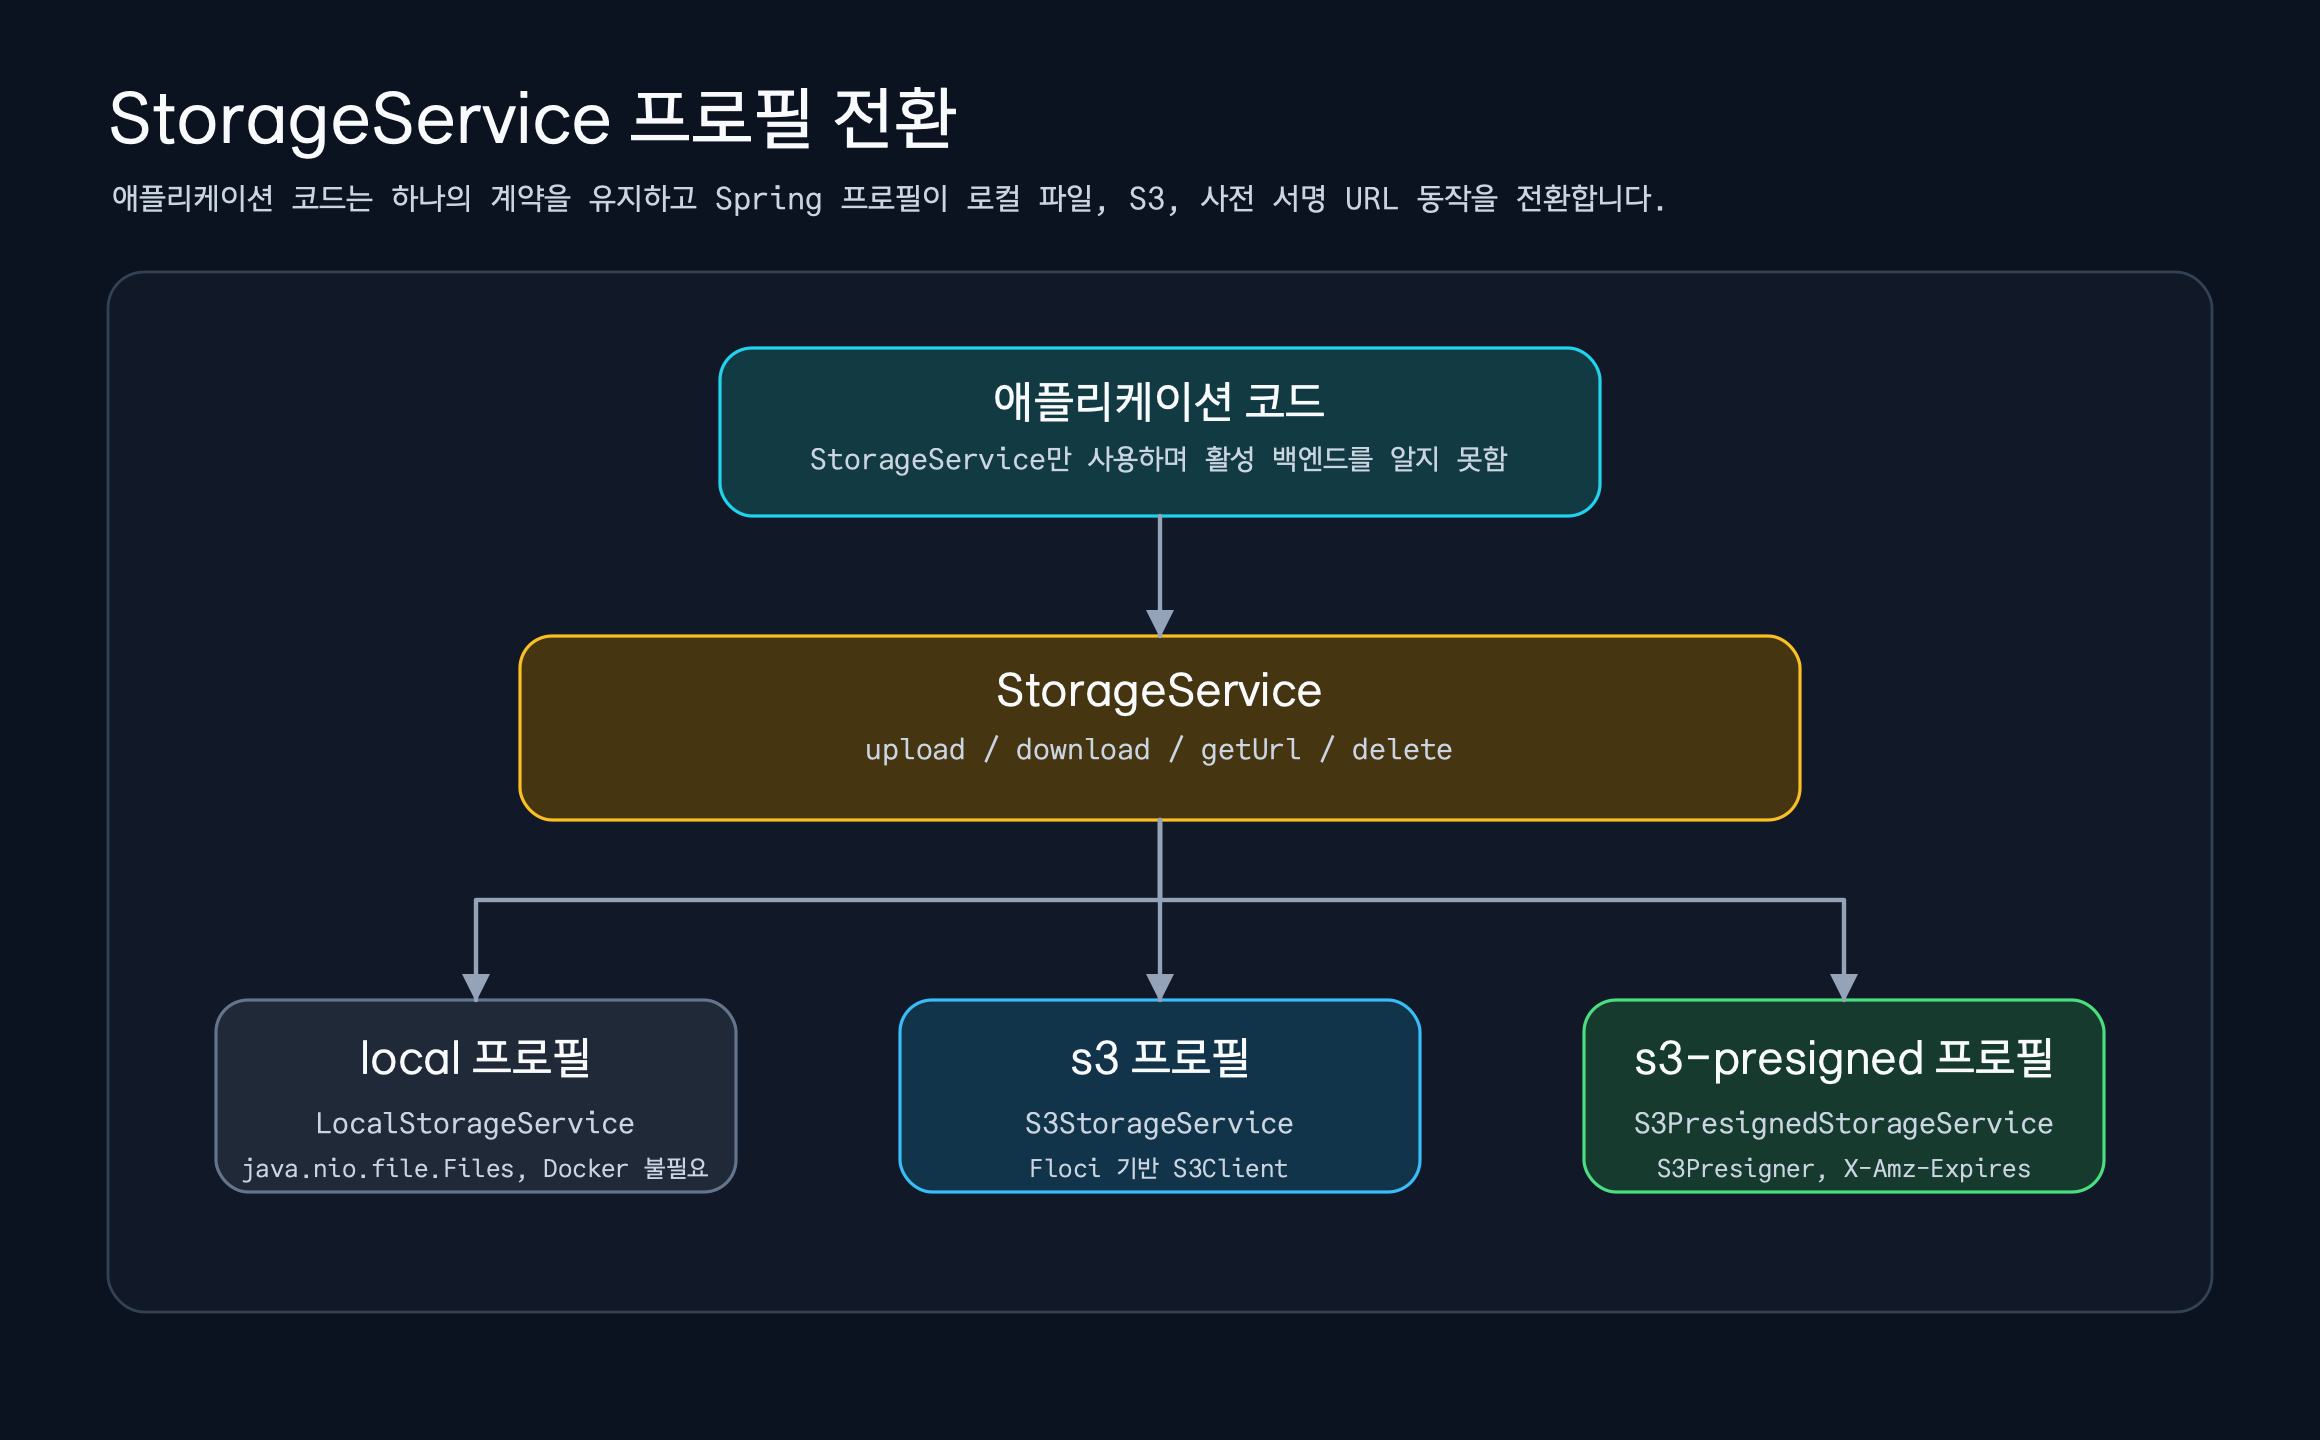
interface StorageService { suspend fun upload(key: String, content: ByteArray, contentType: String): String suspend fun download(key: String): ByteArray suspend fun getUrl(key: String): String suspend fun delete(key: String)}프로필은 세 가지입니다.
| 프로필 | 구현체 | 용도 |
|---|---|---|
local | LocalStorageService | Docker 없이 빠르게 개발하고 테스트한다. |
s3 | S3StorageService | S3Client로 S3 호환 백엔드에 저장한다. |
s3-presigned | S3PresignedStorageService | 저장은 S3에 하고, getUrl()은 사전 서명된 GET URL을 반환한다. |
이 예제는 bluetape4k-aws와 AWS SDK S3를 사용합니다. StorageService라는 애플리케이션 경계를 먼저 정하고,
S3Config가 프로필별 S3Client와 S3Presigner 빈을 직접 구성합니다. 이 구조에서는 서비스 도메인의
파일 저장 계약을 안정적으로 유지하고 로컬 파일 시스템, S3, 사전 서명 URL은 인프라 구현으로 분리할 수 있습니다.
S3Config는 테스트와 로컬 실행에서 FlociServer.Launcher.floci를 사용합니다.
@Configuration(proxyBeanMethods = false)@Profile("s3 | s3-presigned")class S3Config {    companion object {        val floci: FlociServer = FlociServer.Launcher.floci    }
@Bean fun s3Client(): S3Client = S3Client.builder() .endpointOverride(floci.awsEndpoint) .region(Region.of(floci.regionName)) .credentialsProvider(staticCredentialsProviderOf(floci.awsAccessKey, floci.awsSecretKey)) .build()}S3Client는 블로킹 클라이언트이므로 구현체는 withContext(Dispatchers.IO)로 감쌉니다. 이 부분도 예제에서 확인해야
합니다. 단순히 S3를 사용하는 데서 그치지 않고, Kotlin 코루틴 서비스에서 블로킹 I/O를 어디로 격리할지까지 다룹니다.
override suspend fun upload(key: String, content: ByteArray, contentType: String): String = withContext(Dispatchers.IO) { ensureBucketExists() s3Client.putObject( { req -> req.bucket(bucketName).key(key).contentType(contentType) }, RequestBody.fromBytes(content) ) "https://s3.amazonaws.com/$bucketName/$key" }테스트도 프로필별로 분리됩니다. local 프로필은 Docker 없이 실행되고, s3와 s3-presigned 프로필은 Floci 기반
S3 호환 엔드포인트를 사용합니다. 서비스 코드는 하나지만 백엔드 검증은 프로필별로 나뉩니다. 실제 서비스에서도
처음에는 local로 빠르게 시작하고, S3 저장이 필요해지면 프로필과 인프라 빈만 바꿀 수 있습니다.
이 워크숍을 실제 서비스에 적용할 때는 순서가 더 분명해집니다. 먼저 도메인 서비스는 StorageService에만
의존합니다.
@Serviceclass DocumentService( private val storage: StorageService,) { suspend fun saveDocument(documentId: String, bytes: ByteArray): String = storage.upload( key = "documents/$documentId.bin", content = bytes, contentType = "application/octet-stream", )}이 코드는 local, s3, s3-presigned 중 어느 프로필이 활성화됐는지 모릅니다. 따라서 컨트롤러나 서비스 테스트는
대부분 local 프로필로 빠르게 실행할 수 있습니다. S3 호환성은 별도 통합 테스트에서 확인하면 됩니다.
./gradlew :aws-storage-abstraction:test
./gradlew :aws-storage-abstraction:bootRun \  --args='--spring.profiles.active=local'
./gradlew :aws-storage-abstraction:bootRun \  --args='--spring.profiles.active=s3-presigned'
프로필별로 바뀌는 것은 StorageService 구현체입니다. local은 {basePath}/{key}에 파일을 쓰고 file:// URL을
반환합니다. s3는 객체를 S3 호환 백엔드에 저장하고 일반 S3 URL 형태를 반환합니다. s3-presigned는
저장은 동일하게 S3에 하되, getUrl()에서 S3Presigner로 유효 기간이 제한된 GET URL을 만듭니다.
override suspend fun getUrl(key: String): String =    withContext(Dispatchers.IO) {        val presignRequest = GetObjectPresignRequest.builder()            .signatureDuration(Duration.ofMinutes(presignDurationMinutes))            .getObjectRequest { req -> req.bucket(bucketName).key(key) }            .build()
        s3Presigner.presignGetObject(presignRequest).url().toString()    }
이 차이는 작아 보이지만 운영 환경에서는 중요합니다. 내부 관리자 화면은 download()로 바이트를 직접 읽을 수 있고, 외부
사용자에게는 getUrl()로 사전 서명 URL만 제공할 수 있습니다. 서비스 코드는 StorageService 계약을 유지하고,
배포 환경이나 보안 요구에 따라 프로필과 구현체를 바꾸면 됩니다.
또 하나 확인할 부분은 테스트 전략입니다. 이 예제는 모든 테스트를 실제 AWS에 연결하지 않습니다. local 프로필은
파일 시스템 동작을 빠르게 검증하고, S3 프로필은 Floci 기반 S3 호환 엔드포인트에서 버킷 생성과 객체 I/O를
검증합니다. 실제 AWS 계정 검증은 배포 전 스모크 테스트나 별도 환경 테스트로 분리할 수 있습니다. 개발 과정마다
클라우드 비용과 자격 증명 설정에 묶이지 않으면서도 S3 API 호환성을 검증하는 구조입니다.
Spring Cloud AWS 예제는 어디에 적용하는가
섹션 제목: “Spring Cloud AWS 예제는 어디에 적용하는가”bluetape4k-workshop/aws/s3-spring-cloud도 함께 비교할 수 있습니다. 이 예제에서는 Spring Cloud AWS의
S3Template과 Spring ResourceLoader로 S3를 사용하는 방식을 확인합니다.
s3Template.store("my-bucket", "hello.txt", "Hello, S3!")
val resource = resourceLoader.getResource("s3://my-bucket/hello.txt") as WritableResourceval content = resource.inputStream.bufferedReader().readText()
이 예제의 목적은 Part 4를 반복하는 것이 아닙니다. Spring Cloud AWS가 Spring 리소스 추상화와 템플릿으로
어떤 개발 방식을 제공하는지 실제 코드로 확인하는 데 있습니다. Spring Boot 애플리케이션에서 Spring 방식이
자연스럽다면 이 흐름이 적합합니다. 반대로 Ktor, 코루틴 도우미, 명시적 SDK 의존성, StorageService
같은 애플리케이션 경계를 우선한다면 bluetape4k-aws 예제를 먼저 살펴보는 편이 좋습니다.
어떤 예제부터 실행하면 좋은가
섹션 제목: “어떤 예제부터 실행하면 좋은가”처음부터 모든 예제를 실행할 필요는 없습니다. 해결하려는 문제에 맞춰 순서를 정하면 됩니다.
| 목적 | 먼저 볼 예제 | 검증 항목 |
|---|---|---|
| S3 업로드·다운로드·사전 서명 URL | examples/aws-spring-boot-s3-examples | S3Operations, LocalStack·Floci 설정, 암호화 경로 |
| Ktor에서 S3 REST 클라이언트 사용 | examples/aws-ktor-s3-examples | S3KtorClient, 슬래시가 포함된 키 경로, 스트리밍 다운로드 |
| SQS 리스너와 재시도·승인 | examples/aws-spring-boot-sqs-examples | @SqsListener, 타입이 지정된 페이로드, 수동 승인, 인터셉터 이벤트 |
| DynamoDB 코루틴 저장소 | examples/aws-spring-boot-dynamodb-examples | 향상된 비동기 클라이언트, 테이블 이름 해석기, 저장소 기반 클래스 |
| 서비스 코드와 스토리지 백엔드 분리 | bluetape4k-workshop/aws/storage-abstraction | StorageService, local/s3/s3-presigned 프로필 전환 |
| Spring Cloud AWS 방식 비교 | bluetape4k-workshop/aws/s3-spring-cloud | S3Template, ResourceLoader, Spring 중심 개발 방식 |
Part 5의 결론은 단순합니다. bluetape4k-aws를 도입할 때는 “어떤 AWS API를 호출할 수 있나”보다 “애플리케이션
코드가 어느 경계까지 단순해지는가”를 먼저 봐야 합니다. S3 컨트롤러, Ktor 라우팅, SQS 리스너, DynamoDB
저장소, StorageService 프로필 전환은 결국 같은 질문으로 이어집니다.
반복되는 AWS 연결 코드는 도우미와 어댑터에 맡기고, 서비스 코드는 도메인 계약을 유지할 수 있는가. Part 5의 예제들은 이 질문에 답하기 위한 출발점입니다.
참고 자료
섹션 제목: “참고 자료”- Spring Boot S3 예제: README.ko.md
- Spring Boot S3 컨트롤러: S3DocumentController.kt
- Ktor S3 예제: README.ko.md
- Ktor S3 라우팅: S3KtorServerExamples.kt
- Spring Boot SQS 예제: README.ko.md
- SQS 리스너 예제: ReceivedOrderStore.kt
- Spring Boot DynamoDB 예제: README.ko.md
- DynamoDB 저장소 예제: OrderRepository.kt
- 스토리지 추상화 워크숍: README.ko.md
StorageService계약: StorageService.kt- S3 프로필 설정: S3Config.kt
- Spring Cloud AWS S3 워크숍: README.ko.md
댓글
GitHub 계정으로 의견을 남기거나 reaction을 남길 수 있습니다.